
Steps for Maximizing Performance
1) Always follow the manufacturer's recommended pressure settings for your
handpiece model. Most handpieces run between 30-40 psi. Running the handpiece
at higher pressures will decrease the life of the bearings.
2) Clean the outer casing with warm water and a soft bristle brush. Do not use
strong soaps or detergents. You can wipe the handpiece with a damp cloth and some
isopropyl alcohol. Do not soak handpiece in an ultrasonic cleaner,
unless manufacturer specifically recommends to do so.
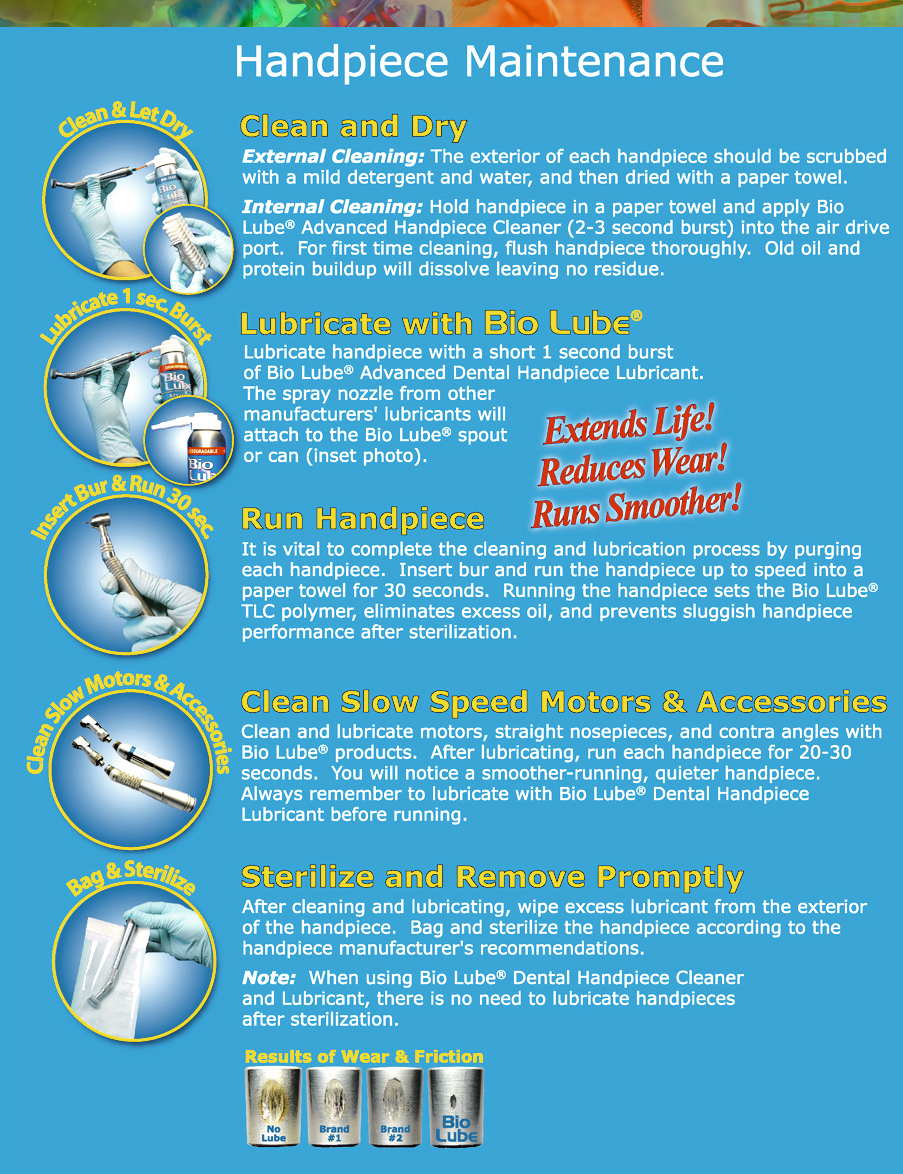
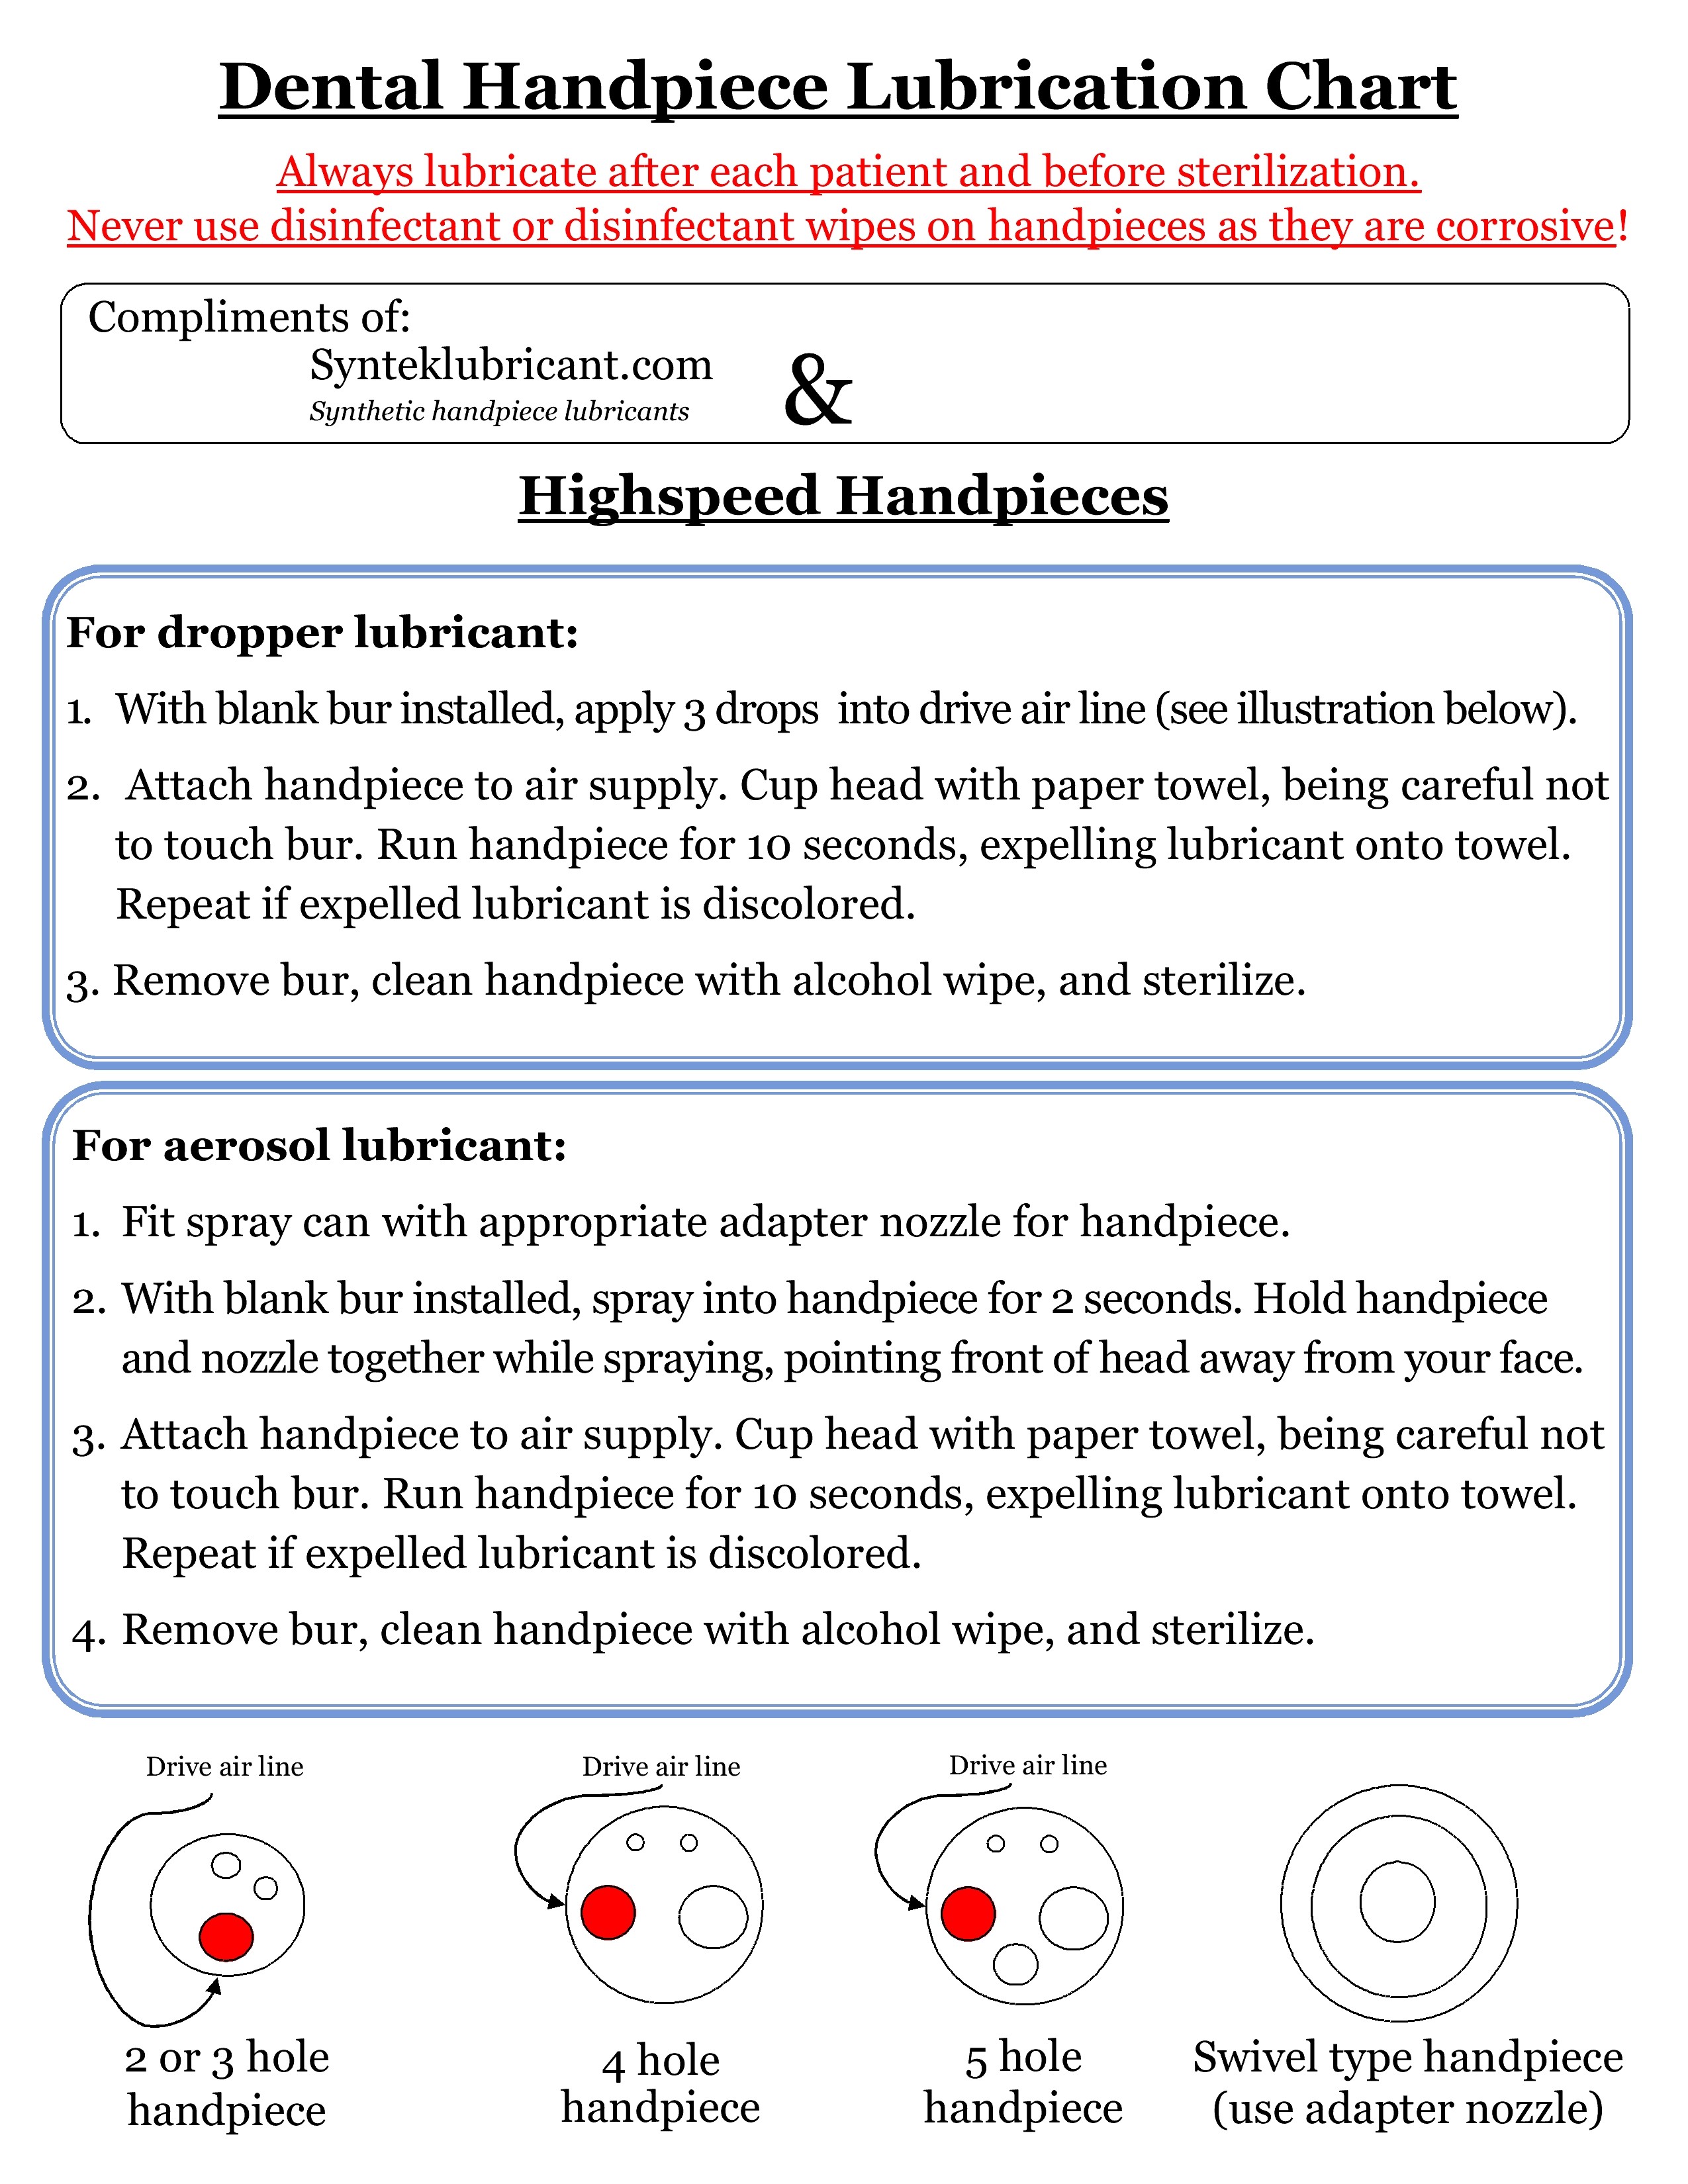
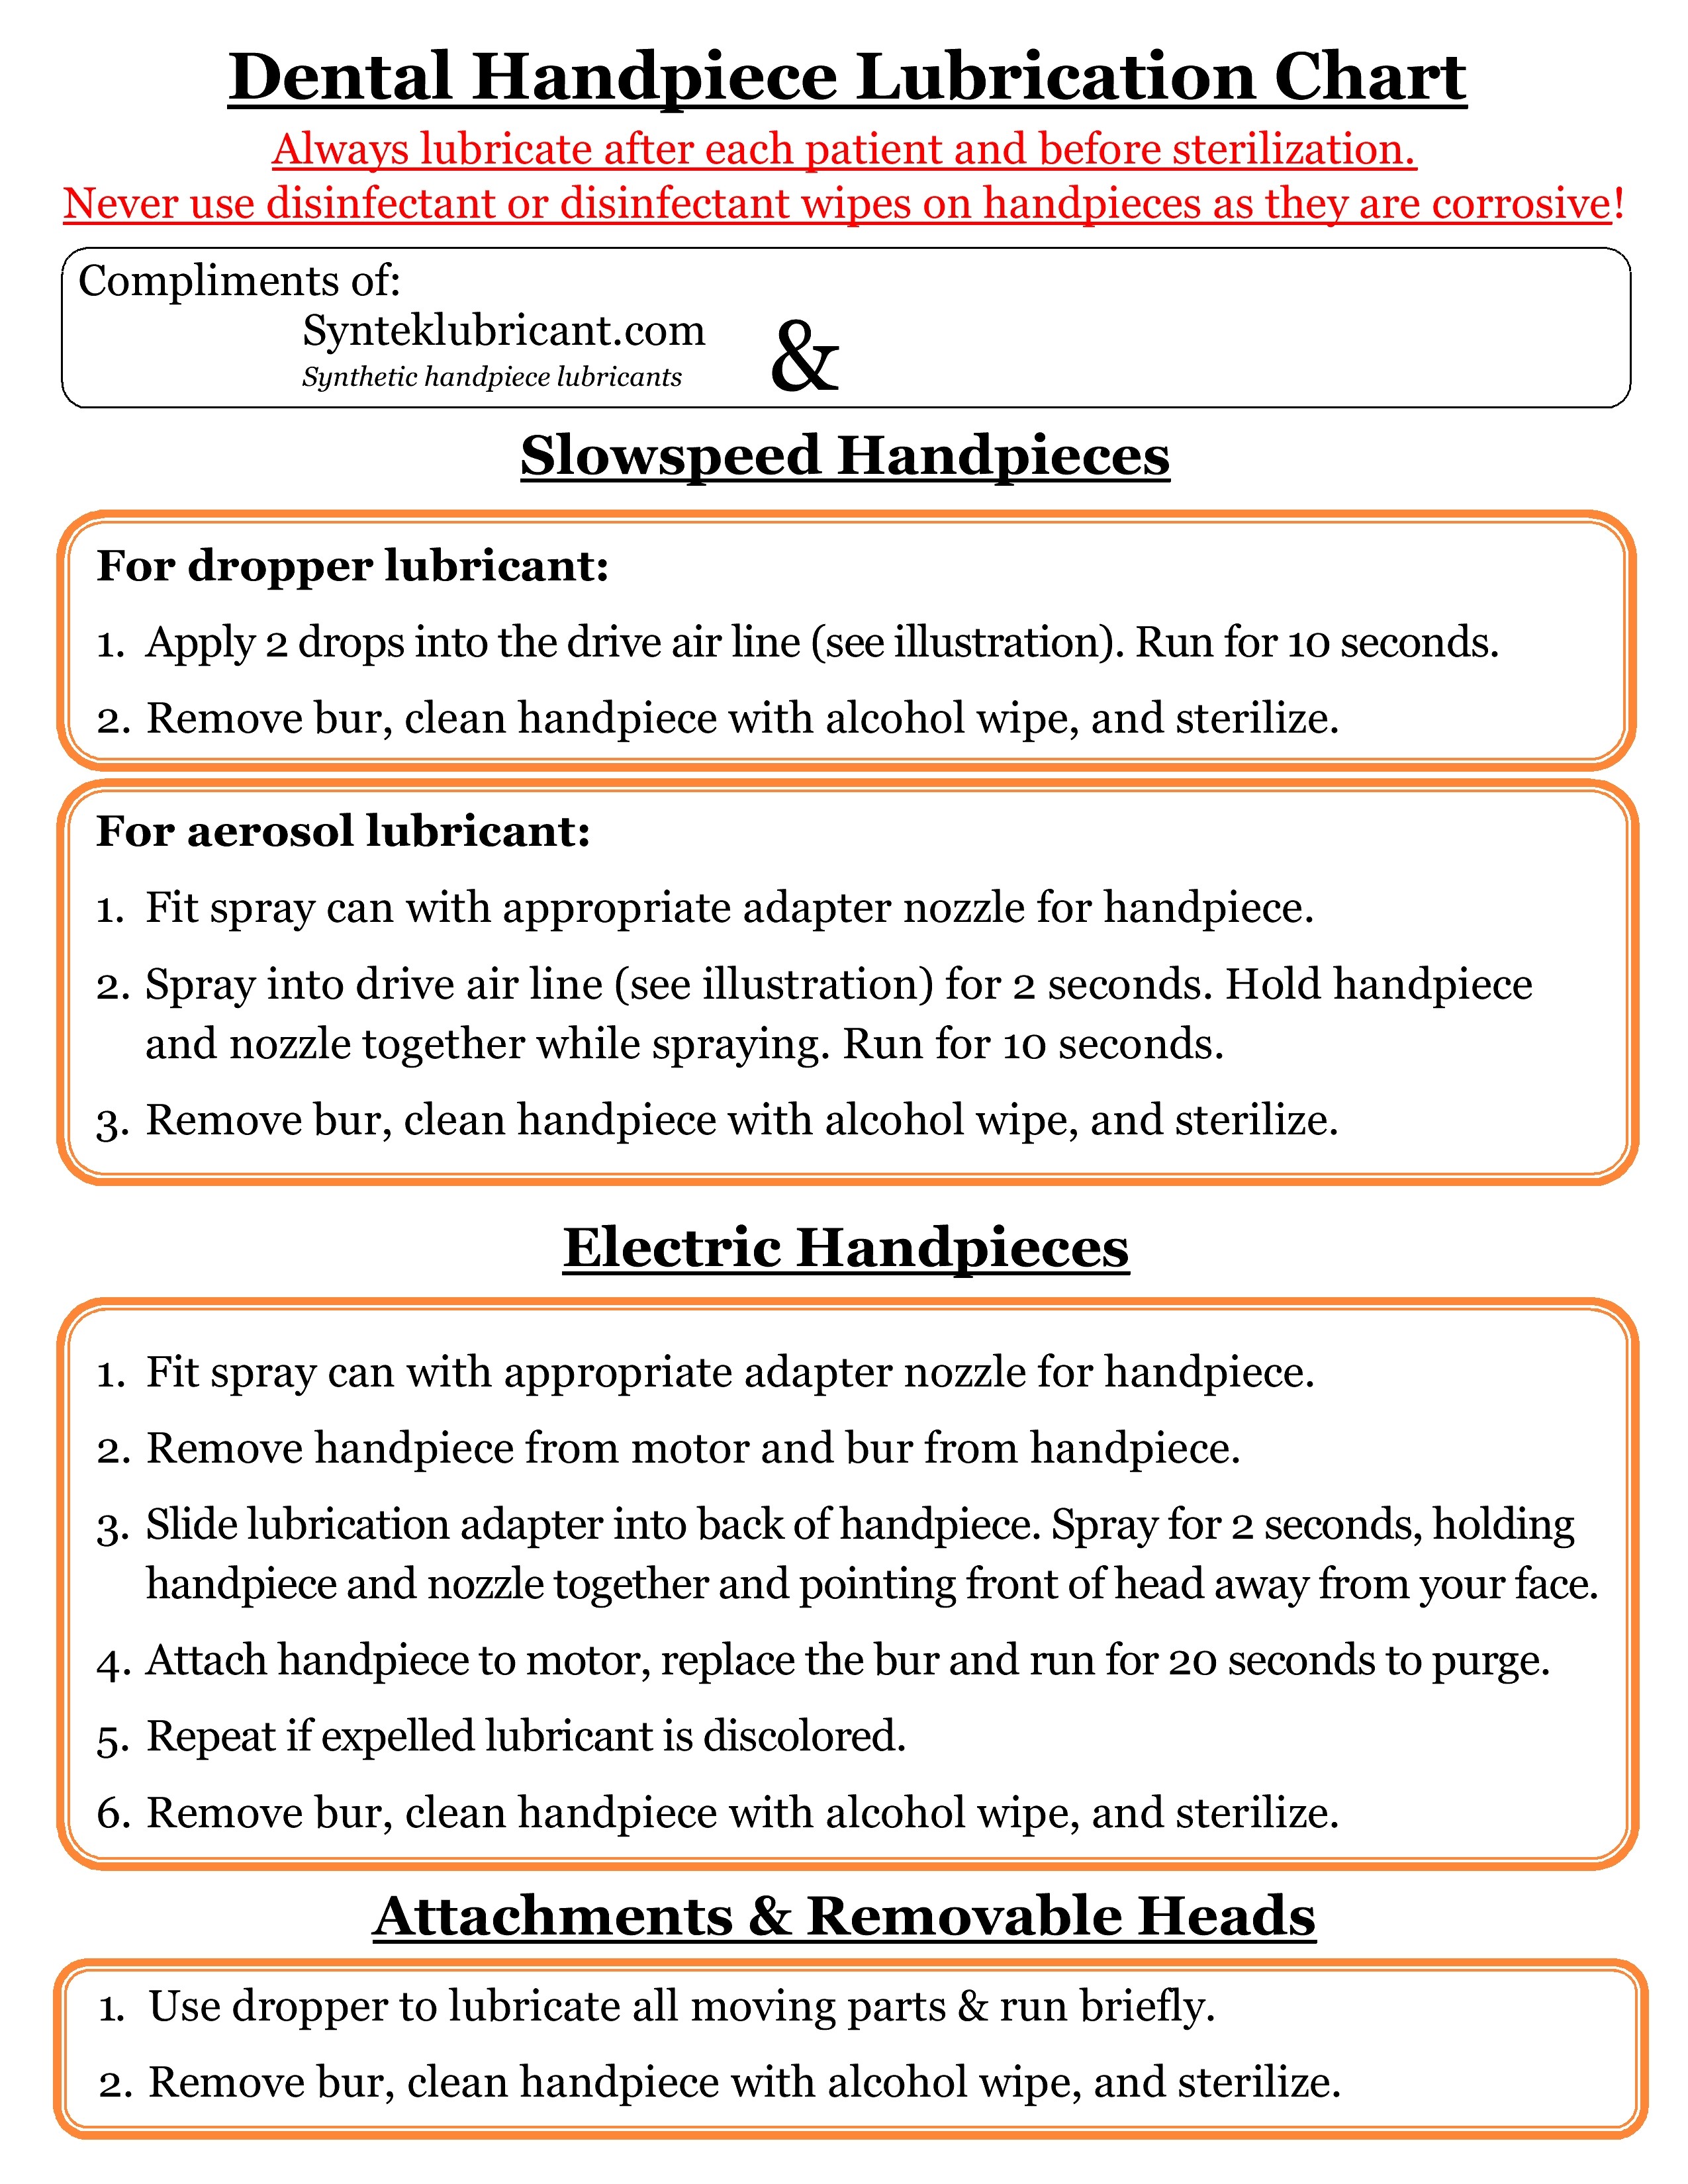
3) Now lubricate the handpiece with lubricant. Usually apply 2 bursts around
3 seconds each if using spray type lube, or 2-3 drops of other types of lubricant.
Ensure you are spraying into proper port. This is in the supply port, not the larger exhaust
port.
4) Insert a bur into the chuck and secure. Attach the handpiece connector
or use the flush system.
5) Run the handpiece at half-speed for 20 seconds. Point the handpiece into a cloth
or flush bag when purging. This will remove the excess lubricant and loose particles
that may be present inside handpiece. The lubricant expelled from the handpiece
should be clear. If lubricant is not clear, repeat the steps above. Removing the
excess lubricant and loose particles from inside the turbine casing will prevent
damage to the bearings during the heat sterilization process, and prolong turbine life.
6) Before putting handpiece into sterilization pouch, clean the fiber optics lenses
with a cotton swab dipped in isopropyl alcohol. Any debris on fiber optics will
attach itself to lenses during the heat process.
7) Now, remove the bur, and insert handpiece into sterilization pouch, or follow
manufacturer's instructions for proper sterilization procedure. You should place
the pouch with the paper side up to allow moisture to dissipate from inside the
pouch. Try not to stack pouches on top of each other. After the sterilization process
is complete allow the handpiece to cool down.
8) Some handpieces require lubrication after sterilization. If this is the case,
use a different lubrication can and nozzle (in order to prevent cross-contamination)
and spray 1 burst for 2 seconds, or 2-3 drops.
9) Insert a bur into the handpiece and run at half-speed for another 20 seconds.
Wipe any excess lubricant with a clean gauze or cloth. Remove the bur.
Your handpiece is now ready for use.
10 Easy Steps to Longer Bearing Life
*CORRECT LUBRICATION AND STERILIZATION PROCEDURES TOGETHER WITH PROPER PSI SETTINGS ARE THE MOST IMPORTANT FACTORS FOR MAXIMIZING BEARING LONGEVITY.*
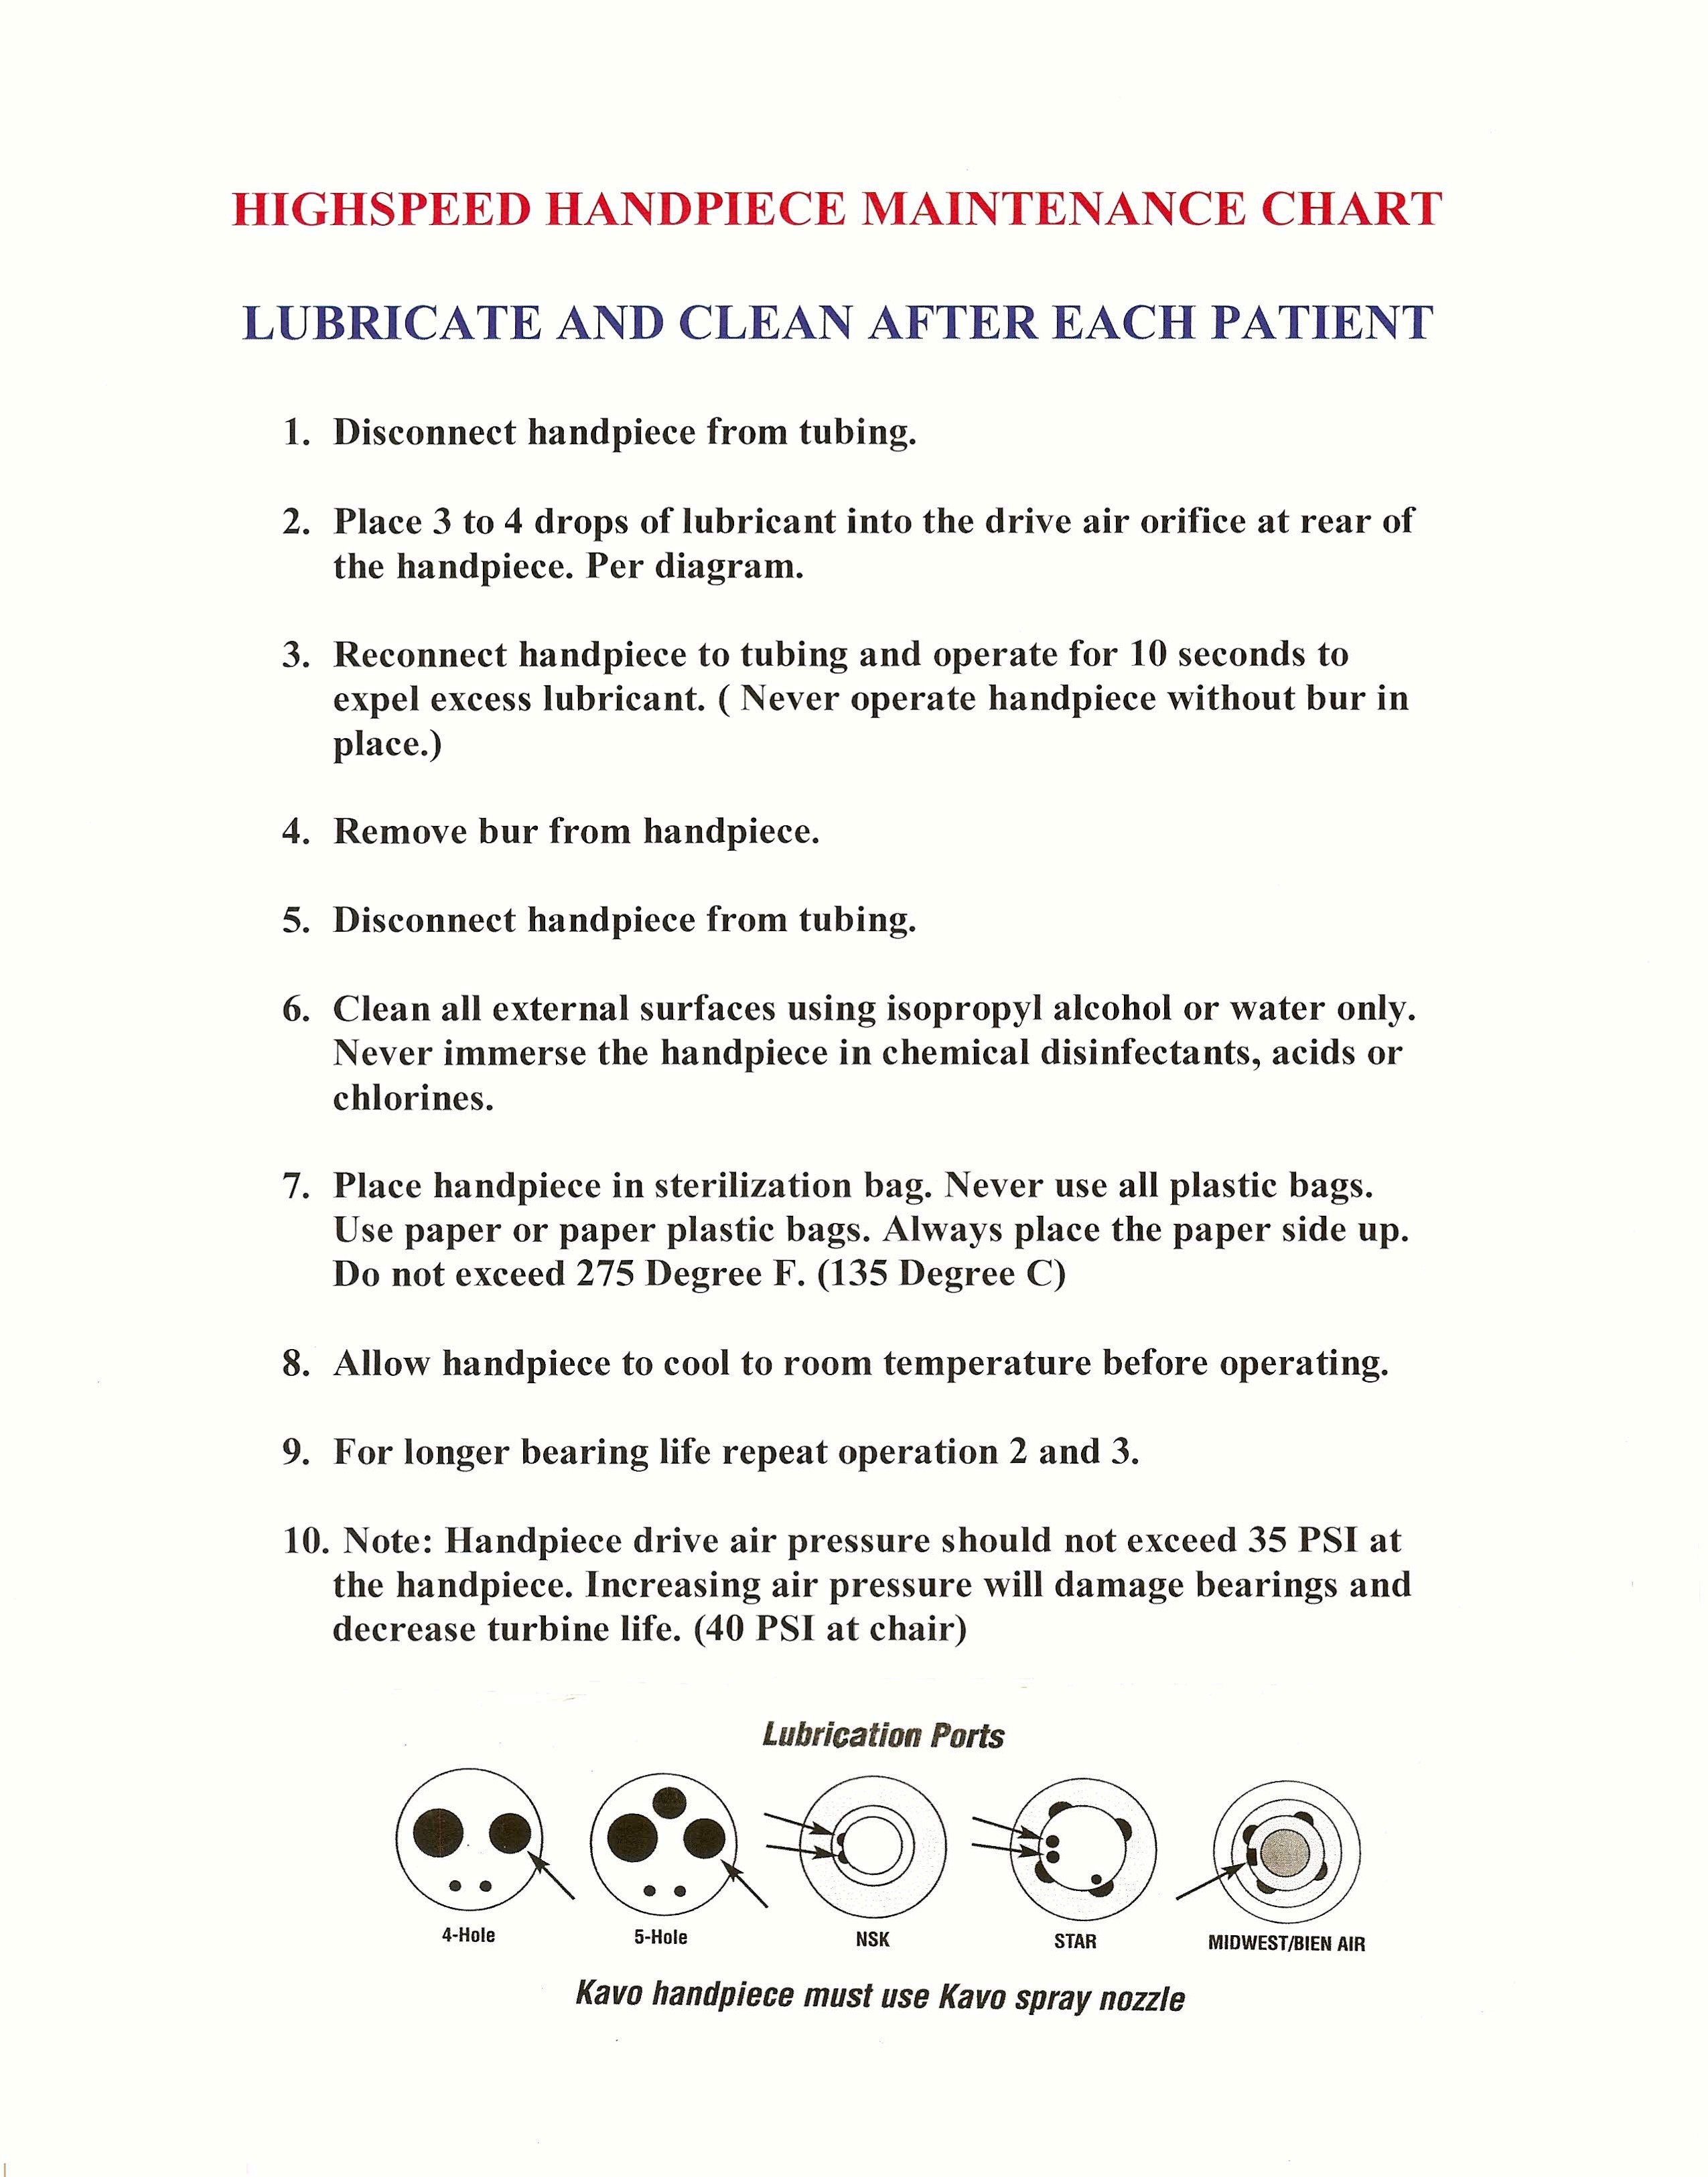
1- Prepare and clean handpiece. Be certain to re move any visible debris; you may use a soft bristle brush under warm running water. If you choose to use soap or detergent, thoroughly rinse and dry. NOTE: Some handpieces such as Star 430SWL Vortex models cannot be exposed to any soaps or disinfectants. DO NOT soak or place the handpiece in an ultrasonic cleaner, unless the manufacturer specifically recommends to do so.
2- Lubricate the handpiece with the recommended manufacturer’s lubricant and nozzle (if applicable), typically we suggest applying a 2–3 second burst of lube or 3–4 drops if using a drop-type lubricant, such as LubriCleanse. NOTE: Some handpieces such as STAR 430SWL Vortex models do not require lubrication.
3- Insert and secure a bur in the chuck. Re-attach hand piece to tubing or use a handpiece flush system.
4- Run handpiece at 50% speed for approximately 20–25 seconds—this will expel the excess lubricant AND carry away any loose dirt and debris. PLEASE NOTE: If after this step you still see discolored lubricant being discharged from the handpiece head, repeat steps 2–4. By maintaining a clean turbine, you will ensure maximum bearing longevity. Failure to do so will result in excess debris accumulating within the head area, which will bake on the bearings during each heat sterilization cycle.
5- Remove bur from chuck. Clean fibre optics with a cotton swab moistened with isopropyl alcohol. Bag and autoclave handpiece per manufacturer’s instructions. NOTE: For better drying, place bag in the sterilizer tray with the paper side of the bag facing up.
Where to lubricate;
6- Once the sterilization cycle is complete and the handpiece has cooled down, if post-sterilization lubrication is required (N/A with Kavo Spray, LubriCleanse or STAR Vortex handpieces), all others re-lubricate 1–2 seconds with spray type lube or apply 1–2 drops of drop-type lubricant. NOTE: To avoid cross-contamination, be sure to use a separate can or bottle of lube.
7- Flush the air and water lines of dental unit for 20 seconds, prior to connecting the hand piece to the tubing.
8- Re-insert bur, re-attach handpiece to tubing or handpiece flush system. Run handpiece at 50% speed for 15–20 seconds.
9-If any lubricant remains on the handpiece, gently wipe the body with a clean gauze pad.
10-That‘s all there is to maintaining your handpieces! Your sterilized handpiece is now ready for use or storage.
Additional Notes
-
NEVER cheat your burs. ALWAYS fully insert a bur into the chuck and secure properly. If you attempt to extend it from the chuck the bur may dislodge while in use, causing injury to you and your patient. It will also contribute to premature bearing and chuck failure and may void your warranty.
-
NEVER use any type of tool to remove a stuck bur from a chuck. Doing so can cause irreversible push button chuck damage. Call Orion Repair, 1 888 674 6657, instead!
-
NEVER use a hot or warm handpiece directly from the sterilizer, doing so will greatly reduce turbine longevity. Never place hot handpieces under cold water to rapid cool, allow for an adequate cool down period. For rotational purposes, a minimum of four handpieces are recommended per station.
-
ATTENTION Midwest handpiece users! Remember to close the lever on all "power lever" handpieces prior to autoclaving. Always remove the bur from the power lever chuck prior to autoclaving.
*Due to the high number of variables involved with "in-house" maintenance, please understand the above is in no way an expressed or implied guarantee for bearing longevity.

|
We welcome business from all countries of the world.
|


